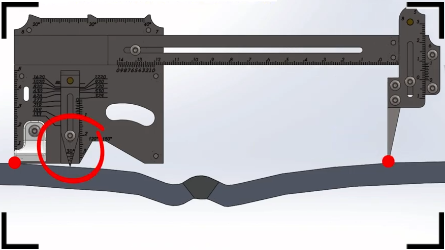
Measurement of the edge trimming
Edge trimming - It’s the deviation from roundness as a result of deformation that occurs during assembly and welding in that zone:
- longitudinal welded joints of shells and conical bottoms, butt welded joints of bottoms from petals;
- ring welded joints of shells and conical bottoms

- To take measurements, use a welding gauge with an elongated linear member 3.
- Position the welding gauge from the side of the surface below so that the leftmost point of the base is about 100 mm away from the axis of the weld.
Set the taper gauge 5 at the zero position and extend the linear member 3 as much as possible.
Tilt the welding gauge so that the taper gauge 5 makes contact with the inspected object.
In this position, the welding gauge should touch the object at two points which are the leftmost point of the base and the taper gauge 5 fixed in the zero position.
Adjust the fillet arm 2 until it makes contact with the inspected object and firmly fix it at this position with the spring nut on set screw 6.

˟ when taking measurements, it is necessary to use the welding gauge combined with an extension bar
- Measure the parameter h sequentially at points 1 and 2
- The desired value is the maximum of the two measured values h₁ or h₂


 — Бесплатные Сайты и CRM.